
Soldering, Stone Setting, and Plating
Swarovski offers an ideal product selection for soldering, allowing for simple and problem-free production of state-of-the-art products. Further techniques such as stone setting and plating complement the comprehensive and diverse application options offered by Swarovski.
Product Overview & Machines and Tools
The following products are suitable for soldering, stone setting and plating:
| Product | Soldering¹ | Stone Setting | Plating¹ |
|---|---|---|---|
| Round Stones | ✓ | ||
| Fancy Stones | ✓ | ||
| Flat Backs No Hotfix | ✓ | ||
| Cupchains | ✓ | ✓ | |
| Multi-Row Cupchains | ✓ | ✓ |
1 It is recommended to use the unplated version (Z) of Cupchains.
Machines and tools
The following machines, tools and aids can be used for soldering Swarovski crystals:


It is recommended that solder wire with a flux core is used, which guarantees an even flow of solder.

Solder paste containing flux must be applied at exactly the right spot to create a clean solder joint.

Solder pellets should be placed in an acid flux before being used. This ensures that the solder will flow correctly.

J-board, express cement, impression material, putty


Tools and setup support
Typical machines, tools and materials used for this application include:
- Micro soldering kit
- Propane gas burner
- Blow torch
- Solder wire
- Soldering paste
- Solder pellets
- Flux
- J-board (solder mold)
- Impression material / (dental) putty
- Settings
For help assembling a suitable tool and material set for your project, contact eCrystalHouse. We can review the application requirements, help identify the equipment and consumables needed, and assist with sourcing a suitable setup for your intended task.
Application
Solder mold production
A solder mold is required to reproduce production pieces. First the original model of the piece is soldered. This is then used to make an impression in a suitable impression material (J-board, express cement). Depending on the size of the piece and mold medium, this impression can be made several times.

Solder the original model.

Strengthen the rear of the original model with wire.

Press the original model into a suitable impression material.

Once the material hardens, the original model can be removed.
Note: The solder mold must be designed in such a way that hardly any pressure is needed to position the Cupchain segment into the mold. The crystals may be damaged if there are high levels of mechanical stress on the cups, or if they are deformed.
Soldering Preparation
Materials and tools should be clean, and particularly free of any grease, to ensure proper application. When soldering and plating, adequate ventilation is essential. In addition, it is recommended that protective clothing, protective eyewear and protective gloves are worn in line with the manufacturer’s safety information sheets. Wearing protective gloves also prevents tools from getting dirty.
Selecting the optimum solder and flux
When selecting solder, the working temperatures and flow characteristics are particularly important. Solder is available from various manufacturers in wire form, with or without a flux core, as a paste and as pellets.
Note: Only soldering alloys with a working temperature up to 280 °C (536 °F) should be used for soldering Cupchains. The higher the working temperature of the solder material used, the more precise workmanship and exact temperature control are necessary to avoid damaging the crystal and the foiling.
When soldering Cupchains, solder wire with a flux core is more suitable. If solder pellets are being processed, or the wire used does not have a flux core, the flux should be adapted according to the solder manufacturer’s instructions, while any corrosive effects on the foiling should be checked via pre-testing. These effects should be assessed after plating, as damage done during soldering is often only visible at this point. For soldering Cupchains we suggest using one of the following lead-free solder wires:
| Name | Composition | Melting range |
|---|---|---|
| Envirosafe | 96.5% Sn, 3.45% Cu, 1% Sb, 0.05% Ag | 215–220 °C 419–428 °F |
| Silox 227 | 99% Sn, 1% Cu | 227 °C 440 °F |
Soldering
Soldering time and temperature
The right flame size and the time it is applied are important criteria when manufacturing soldered Cupchain pieces. The size of the flame must comply with the instructions for use provided by the tool’s supplier. Only heat the part of the jewelry piece in which the solder should flow. If the flame is held too long on the jewelry piece, the piece and the crystals may become overheated and therefore damaged or destroyed.

Note: A sudden drop in temperature after the soldering process should be avoided (e.g. shock cooling), as this could damage the crystal (e.g. chipping).
Color during soldering


Color after soldering


Optimum soldering joint
The width of the joint to be soldered should be between 0.05 mm and 0.2 mm. If the joint is wider than 0.2 mm, the solder will not fill the joint sufficiently. A joint that is too narrow will also not contain enough solder to make it strong and neat.


Optimum solder quantity
The right amount of solder ensures strong and clean soldered joints, which can then be cleanly plated. Correctly applied solder flows into the joints of the jewelry piece and provides a strong connection. Either too much or too little solder can damage the creations or result in unwanted discoloring of the crystal.


The solder is drawn into the solder gap via capillary action.

Too much solder results in the cup back-filling, with the hot solder damaging the foiling. This damage creates a corroding surface following plating, and the foiling is destroyed. As such, these types of soldering errors are only really visible after plating.

Too little solder means the soldering gap is not completely filled, and the joint is weakened.
Soldering

Cut the Cupchain to the required length.

Put the Cupchain in the solder mold.

Solder the required spots.

Remove the soldered Cupchain from the mold.
Stone setting
Stone setting is the art of securely setting or attaching crystals by creating positive-locking connections. Alongside the application methods outlined in this manual, Swarovski products can also be employed using metal settings. Crystals can be set manually (using pliers, metal spatulas, or punching tools) or by machine. According to how the crystals are integrated into the metal settings, there are various types of settings, both plated and unplated. Whenever possible, the crystals should be set before plating the settings. Crystals can be set after plating as well, depending on the shape and geometry of the finished product. Please be aware that a selected range of Swarovski crystals cannot be plated. For further information on this, please see the current Swarovski Components Collection.
Setting types

With bezel settings, the crystals are bezelled in to remain in the cup.

With prong settings, crystals are held in position by claws. In most cases there are four prongs. Settings with flaps have significantly broader claws. The advantage here is that the broader claws are much less likely to damage very sensitive carrier material.

In this type of setting (crystal) elements are glued in.
Setting by hand
1. Depending on the shape and size, the cup is held using tweezers, flat nose pliers, or flat head pliers, without deforming it.
2. Place the crystal in the setting using a pair of tweezers or vacuum tweezers.
2a. Bezel setting: Press the cup shut using a setting closer. Setting closers are available from jewelry suppliers.
2b. Prong setting: The prongs of round cups can be pressed in place using a suitable setting closer. For all other forms, the prongs are individually closed in opposite positions, using a suitable pressing tool.

Note: After setting, the crystal should still be slightly movable in the setting. The setting must be constructed so that the crystal can be positioned into it without damaging the foiling. When settings are too tight or prongs are bent, the foiling or the protective lacquering can be damaged, possibly resulting in corrosion. If the setting is closed too strongly, the crystal can be damaged.
Additional information for setting of Fancy Stones and Round Stones into settings
When setting Swarovski crystals into proper settings, following criteria shows if the setting is done properly and the crystals are set secure and ready for further application steps such e.g. sewing:
- Setting size must not be too big, to avoid crystal to drop into it
- Setting height should not be too low to avoid reverse side of the crystal to protrude from the setting’s reverse side
- Functionality of the setting needs to be given after setting the crystal, for example a setting with holes must allow the sewing needle to fit easily and smooth through the holes of the setting, without being affected by the reverse side of the set crystal.
- Closing the prongs needs to be possible without high effort
- Length of prongs needs to be enough to hold the crystal secure without covering big areas of the crystal surface and the facets
The following pictures show an optimal example of a set crystal:

- Only closed prongs are visible, no setting frame visible

- Depending on the crystals geometry, the crystal lies only on the rim of the setting and is not fully countersink in the metal frame! Therefore a tiny excess at the setting’s rim and a slight visibleness of the crystal’s foiling may appear and is standard.
- The far apart positioning of the holes offer best possible stability in textile application.
- To gain an optimal crystal positioning, it is essential that the crystal only lies at 3 points directly on the setting! Dependent on the shape of the Fancy Stone, usually this contact points are in the front and backpart of the crystal (e.g. as marked in the picture above)
Working with end connectors
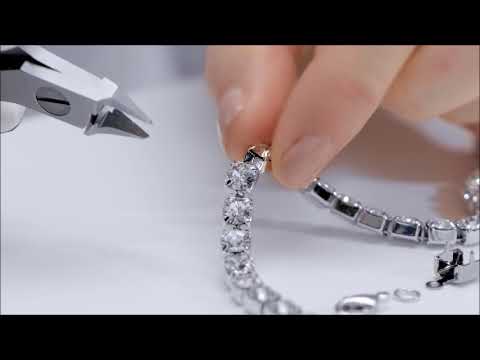
Plated Cupchains and Findings can easily be combined with end connectors in order to create striking finished pieces.


The end connectors can be attached to the end of the Cupchain with flat-nosed pliers and interconnected by either jump rings or lobster claws.
Application Instruction Movie
Attaching end fasteners
Cleaning
To avoid corrosion, soldered items should be cleaned as soon as possible after the soldering process. This will make the plating process significantly easier. Care must be taken when using mechanical polishing devices. Polishing media that are too hard or drums that rotate too quickly can damage the items and the crystals. Check the quantity, the polishing agents and time, the rotating speed, and the height of the fall, in order to keep mechanical stress levels as low as possible. In order to preserve the high quality of the creations, we recommend not using organic solvents and not exceeding a maximum temperature of 100 °C (212 °F).

Plating
Plating serves to finish the product piece. During this process, metallic coatings are electrolytically added to the surface of the material. The process can only be carried out if the material to be plated is conductive. During the design process, please ensure that individual colors and coating effects can withstand plating. For further information, please see the color overview in the current Swarovski Components Collection.
When plating items including crystals following criteria are essential to avoid a chemical and/or mechanical damage to crystals and to achieve an excellent finishing process:
- no strong alkaline and cyanide solutions
- short exposure times in alkaline baths
- moderate ultrasonic cleaning
- moderate current densities
- selecting reliable electrolyte suppliers who offer good service and who can provide detailed operating instructions
- selecting suitable high performance electrolytes
- careful maintenance of the unit and the electrolytes

Short descriptions of the processing steps
- Soak Cleaning: Here, most of the surface pollution (e.g. dirt, grease, soldering flux) is removed.
- Electrolytic degreasing: Only cathodic degreasing, suitable for brass and non-ferrous metals, is recommended for fine cleaning Cupchain jewelry.
- Acid Dip: This part of the process serves to remove oxidization from the metal and also the remains of any scale left from the soldering process.
- Cyanide copper plating: This processing step serves to improve adhesive strength and conductivity.
- Pyrophosphate copper plating: Like cyanide copper plating, this process improves adhesive strength and conductivity. The advantage is that the process does not involve cyanide, though the disadvantage is that higher current densities and longer exposure times are required.
- Bright copper plating: The use of sulfuric bright copper plating is recommended because of its excellent ability to cover surface flaws and create an even finish.
- Palladium coating: Palladium is presently the only recommended replacement for nickel since the bronze electrolytes currently available on the market can, through their extreme alkalinity, lead to damage of the foiling.
- Silver coating: Shiny silver coatings are usually separated from cyanide solutions that contain alkali silver (I)-cyanide, alkali cyanide, alkali carbonate, and organic and/or inorganic additives.
- Gold coating: It is recommended to use phosphorus or citric acid electrolytes (pH ˜ 3–4), which contain potassium gold (I)-cyanide.
- Rhodium coating: Sulfur or phosphoric acid based electrolytes are used for rhodium plating, from which shining, nearly silver-white layers can be applied.
- Tarnish protection – Temporary protection against tarnishing: These are based either on wax mixtures in organic solvents or long-chained sulfuric organic compounds, which can be used as wet-on-wet aqueous emulsions.
- Permanent tarnishing protection systems: Cataphoretic lacquering systems have been proven especially effective as a longer lasting protective system for Cupchain jewelry. They have the advantage over conventional dipping and spray lacquers based on acrylic or zapon varnish (cellulose lacquer) in that only the conductive surfaces are very evenly coated while the isolated facets of the crystals remain uncoated.
Example of a plating process for Cupchains

Quick Assistance
The following table outlines typical soldering, stone setting and plating problems, along with possible causes and recommendations on avoiding them.
| Problem | Possible cause reference |
|---|---|
| Metal components: The solder joints crack. | 1,2,3,4 |
| Metal components: The product piece has restricted movement. | 2,5 |
| Metal components: The metal surface is defective. | 2,6 |
| Metal components: The metal surface is uneven. | 7 |
| Metal components: Defective finishing on the soldered areas. | 8 |
| Metal components: Corrosion occurs on the metal. | 9 |
| Crystals chips off. | 10,11,12,13 |
| Crystals become discolored. | 14,15,16,17 |
Causes and recommendations
| No. | Cause | Recommendation |
|---|---|---|
| 1 | Too little solder is used. This weakens the solder joint, as the soldering gap is not completely filled. | Use more solder. |
| 2 | Too much solder is used. A large solder joint can result in cracks, because any force applied to the piece directly affects the solder. | Use less solder, especially in the areas close to the moving parts. Too much solder at these parts restrict their flexibility. |
| 3 | The flow of the solder is insufficient. | The following factors contribute to a sufficient flow of solder: The flame needs to be strong enough so that both solder and cup can heat up to the required working temperature. To make sure the flux cannot vaporize, the soldering temperature must not exceed 280 °C (536 °F). A vaporized flux means that the solder is not able to cover the metal surface. The melting temperature of the solder must not be higher than 280 °C (536 °F). |
| 4 | The metal surface, solder, flux, or solder mold is dirty. | Special attention must be paid to use clean (and above all grease-free) metal surfaces. |
| 5 | Exposure to the finishing process has been too long. | The exposure time for functional and flexible elements should be kept as short as possible. Optimizing the polishing processes and the use of high quality electrolytes is also recommended. |
| 6 | Insufficient cleaning after soldering. | Incorrect cleaning has a negative impact on the finishing process. Carefully check the cleaning process. |
| 7 | Poor quality of polishing. The metal surface shows irregularities like burns or an orange color. | Carefully polish the product and take care that the processor plating baths are set up correctly. |
| 8 | Unsightly finishing on the solder areas can have several causes: — incorrect soldering — insufficient cleaning after the soldering process — the use of sulfuric acid in the pickling process (if lead-containing solder has been used) — the absence of or incorrect use of copper plating | Carefully follow the soldering steps described in this chapter. |
| 9 | Insufficient rinsing or using contaminated rinsing water can cause tarnishing or corrosion. | The transfer times between the individual stages of the process should be kept as short as possible. Rapid tarnishing of silver can be prevented by using effective tarnishing protective systems (e.g. coatings, wax, lacquer etc.). |
| 10 | Poor quality of solder mold. | The solder mold must be designed in such a way that hardly any pressure is needed to position the Cupchain segment into the mold. The crystals may be damaged if there are high levels of mechanical stress on the cups, or if the cups are deformed. |
| 11 | Thermal shock during the soldering or cooling process can cause tension in the crystals. | Avoid extreme differences in temperature during and after the soldering and cooling process. |
| 12 | When using polishing drums, the surface of the crystals can be damaged through hard polishing components in the rotating machine. | Mechanical stress levels should be kept as low as possible. Check the quantity of articles used, the polishing agents and time, as well as the rotating speed and the height of the fall. |
| 13 | Using barrel plating can damage crystals in heavy or sharp Cupchains due to the Cupchains‘ size or shape. | In general it is recommended that Cupchain items should be finished on a plating rack. If using a barrel plating, choose the best type of drum and optimize the rotation and the fall height. When the drum is between the different stages of the finishing process and contains no liquid, the items being plated inside the drum may damage each other. |
| 14 | The soldering temperature is too high. | If the soldering flame is too strong or the soldering times are too long, there is the danger to overheat the solder joints. This can damage the crystals. It can be helpful using a solder that melts at a lower temperature. |
| 15 | Too much solder is in the cups. This can damage the crystals‘ foiling and subsequently leads to discoloring. | To make sure the right amount of solder is used, remove one crystal from the cup. If there is any solder left in the cup, reduce the amount of solder. This can be achieved by using a solder wire with a maximum diameter of 1 mm or by reducing the time the solder is in contact with the cups. |
| 16 | Incorrect cleaning with ultrasonic can damage the foiling of the crystals. | Take care not to use the ultrasonic too intensively or for too long time. |
| 17 | Faults occured during the finishing process. | Check the alkalinity, current density, exposure times, and temperatures of the plating baths used. Further mistakes could be incorrect rinsing and post processing techniques. |