
Epoxy Clay Applications
For applications with epoxy clay, Swarovski advises the use of Ceralun from company AP Adesives. Therefore, the following content refers to the application and data of Ceralun.
Product Overview & Machines and Tools
Product overview
The following products are suitable for application with Ceralun:
| Product | Ceralun |
|---|---|
| Round Stones | ✓ |
| Fancy Stones | ✓ |
| Crystal Pearls | ✓ |
| Flat Backs No Hotfix | ✓ |
Ceralun is a versatile and strong two-component, high-performance ceramic epoxy composite. This clay has been specifically developed and tailored to embed foiled and unfoiled crystals. It is an absolutely essential material for innovative design. Ceralun has a high level of hardness, rigidity, and shock absorbance. It is resistant to sweat, humidity, or climatic changes, and shows no aging.
Machines and tools
The following machines, tools and aids can be used for the various processes involved in the application of Swarovski products with Ceralun.

Art. 9030/000.


Two-component ceramic epoxy composite, 10 × 50 g.


Art. 9040/022. Can be adapted to a pick-up system by attaching a dispensing tip, ordered separately.


Contains high molecular liquid wax, 100 ml.


Suppliers
The following machines, tools, and aids are commonly used for epoxy clay applications with Ceralun.
- Test Pen
- Ceralun (A + B)
- Ceralun Release Agent
- Isopropyl alcohol / acetone
- Blow torch
- Corona treater
- Plasma cleaner
- Precision balance
- Plastic gloves
- Protective eyewear
- Chaton Sieve
- Vacuum pump with silicone hose
- Tweezers
- Wax stick
- Drying oven
- Freezer
If you need help choosing a suitable setup for your application, contact eCrystalHouse. We can review the crystal type, base material, workflow, and production volume, then help you select and supply a practical tool and material set for testing, pilot production, or regular manufacturing.
Application
When working with Ceralun, optimal results are obtained by coordinating the entire application process. Following the application steps in the right order is very important. Experience has shown that the most common reasons for crystals becoming detached are inappropriate areas of application, the wrong mixing ratio of the two components, or not mixing them together long enough until a homogenous appearance is achieved.
Ceralun two-component ceramic epoxy composite
Ceralun was especially developed for the application of both foiled and unfoiled Swarovski crystals, for professional use within the jewelry segment and other industries such as accessories, interiors, and electronics.
Key features
- Specifically developed and tailored to embed foiled and unfoiled Swarovski crystals.
- High level of hardness, rigidity, and shock absorbance.
- Resistant to perspiration, humidity, or climatic changes and shows no aging.
- Allows new design possibilities.
- Perfect material to generate a large variety of surfaces and structures.
- Applicable on 3D-shaped surfaces.
- Alternative solution to gluing.
Technical data of Ceralun
Checking surface tension and pre-treatment
Ceralun has optimal adhesive characteristics for applications on metal, glass, crystals, gluable plastic surfaces, rubber, wood, cork, and porcelain, unless the materials do not have the right surface tension.
Checking the surface tension
The surface tension is an indicator for the wetting properties of the surface the Ceralun should be applied to.
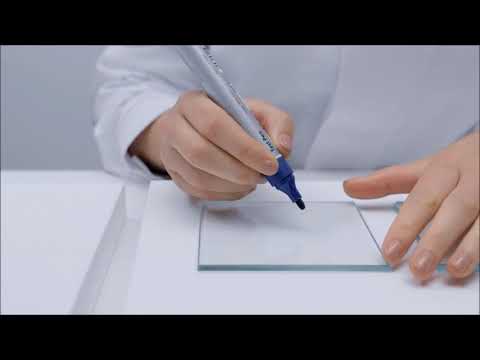
A surface tension of at least 38 mN/m is recommended for working with Ceralun. It should also be randomly tested during production. It is best to use the Test Pen (art. 9030/000) to measure the surface tension.

Mark the surface.

If the ink remains visible for 2 seconds, the surface is suitable for working with Ceralun.

If the ink disappears or forms bubbles, the surface is not suitable for applying Ceralun. In this case, the pre-treatment cleaning methods should be checked.
Note: On porous or absorbent materials, the surface tension cannot be checked with the Test Pen. If the Test Pen is used on highly polluted surfaces (e.g. grease, oil) or on material like wood, the Test Pen might be polluted as well and cannot be used anymore.
Application Instruction Movie
Checking Surface Tension
Watch the eCrystalHouse instruction video on proper Test Pen usage and surface tension checking.
Pre-treatment
If the surface tension is below 38 mN/m, the following pre-treatment cleaning methods, applied in the correct order, can be effective in reaching the right level.
| Types of cleaning | Pre-treatment cleaning methods |
|---|---|
| 1 Mechanical cleaning This involves sanding, blasting, or brushing but is not usually necessary for jewelry. |
|
| 2 Washing and degreasing Here it is important to ascertain that the tensides contain no silicone, as this would impair adhesion. When using solvents it is advisable to test the durability of the surface to be cleaned beforehand to avoid any damage. Solvents containing substances with a high boiling point should not be used due to the high risk of residue. If using cleaning agents, wait a few minutes to allow them to evaporate. |
|
| 3 Physical cleaning and activation These cleaning methods can be applied if mechanical cleaning or washing and degreasing are either not possible or have not resulted in a surface tension of >38 mN/m. Therefore the pre-treatment cleaning method used should be done on a case-by-case basis. |
|
| 4 Chemical cleaning and primers Applying a primer improves adhesion and helps to prevent corrosion. |
|
Dosage, mixture and setting
Please pay high attention to not deviate from the recommended mixing ratio of 1:1 of the components (resin and hardener) and to mix the two components until a homogenous appearance is achieved.
Mixing Ceralun two-component ceramic epoxy composite

Cut off resin and hardener with a knife.

Weight the two components using an electric scale. The mixing ratio for Ceralun is 1:1 by weight.

Both components come in a different shade of color so that it can easily be recognized if they are already properly mixed together.

Mix resin and hardener until a homogenous appearance is achieved.
Application Instruction Movie
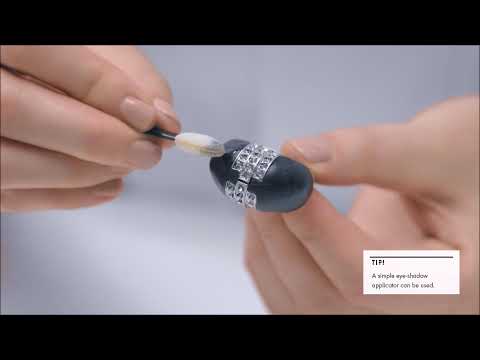
Ceralun
Watch the eCrystalHouse instruction video showing the preparation and application of Swarovski crystals with Ceralun epoxy clay.
Proper setting of crystals
After mixing the two components together, the crystals can be set. To prepare Chatons for the positioning process, a Chaton Sieve can be helpful. Take a sieve according to the Chatons’ size. Place some Chatons onto the sieve. By slightly shaking the tool and wiping over the crystals with glove-covered fingers, the majority of Chatons automatically get turned into the suitable position for gluing (table pointing upwards). As a next step the Chatons can easily be picked up from the sieve using a tool like the wax stick, tweezers, or a vacuum pick-up system. The use of a silicone wax stick is not recommended as this can impair the adhesion and the brilliance of the crystals. Apply the Chatons to the desired position and press down gently. We recommend a maximum working time of three hours at a temperature of 23 °C/73.4 °F to set the Swarovski products. It is not possible to set crystals at room temperature after a period of three hours because the required level of adhesion can no longer be achieved.

Please take care that the pavilion of the crystal is surrounded by Ceralun right up to the level of the stone’s girdle. It is not necessary to leave any particular space between the crystals when setting them.


Processing methods
Different processing methods
Ceralun is the perfect material for generating a variety of surfaces and structures. Possible ways of processing are the free forming method, the stamping technique and the 3D silicone molds.
Free forming

Place and press the clay onto the relevant area. Be careful not to trap air between Ceralun and the base material.

Mold the surface into the required shape.

Smooth the surface of the Ceralun with the Release Agent.

Pick up the crystal with a vacuum pick-up system - or with a pair of tweezers or a wax stick. Carefully place the crystal and press it down gently.
Generating shiny surfaces with the free forming method
When a piece of jewelry is created where parts of Ceralun are visible, a smooth and shiny clay surface might be desired. In order to create a shiny surface, gently wipe and polish the clay with your silicone glove-covered finger using the recommended Release Agent or some water drops. The Ceralun surface can be polished up to 2 hours after the crystals have been set.
Stamping technique
The stamping technique is suitable to produce structured surfaces.

Pre-treat the pattern cautiously with the Release Agent.

Gently press the pattern onto the surface.

After removing the pattern from the clay, the crystals can be set.
Generating shiny surfaces with the stamping technique
If a larger surface of shiny Ceralun is needed, the following tools are required: transfer foil, a pasta machine or rolling pin, and a freezer. Knead the clay and put it between two layers of foil. Smoothen it with the help of a pasta machine or with a rolling pin. Using the pasta machine is the recommended option, as a consistent height of the Ceralun is achieved easier than with the rolling pin. When the clay inside the foil is as flat as desired, put it into the freezer for approx. 15 minutes. The cold reduces the bonding between Ceralun and foil, so that the foil can easily be detached from the flat and shiny clay.
3D silicone molds
The work and cost saving method of using 3D silicone molds is recommended for larger production units. A 3D silicone mold is produced based on a master model. This can be re-used for several times.

First press the Ceralun into the 3D silicone mold to form the required shape.

Any overlapping material can be trimmed off with a knife.

In order to make it easier for you to remove the Ceralun from the mold, it should first be stored in the freezer. The length of time the filled mold should remain in the freezer depends on the thickness and amount of the Ceralun used.

After taking the mold out of the freezer, the Ceralun can be removed from it and gently pressed into place on the chosen object.

Please be sure to remove any condensed water.

Once the Ceralun reaches a lukewarm temperature, you can proceed with setting the crystals.
Curing
The hardening time and final adhesion strength of Ceralun are dependent on the temperature. The total hardening time at room temperature of 23 °C (73.4 °F) takes 72 hours. This can be accelerated using heat of max. 80 °C (176 °F).
Useful information
Extension of pot life

Store already mixed Ceralun in a freezer to extend the pot life. Ceralun can be stored in a freezer for up to 24 hours at a temperature of around −20 °C (−4 °F).

This makes it possible to interrupt the setting process and continue again later without losing the adhesion force.

It is necessary to gently remove any condensed water that occurs during the defrosting process.
Mixing Different Colors of Ceralun
You can mix different colors together as you wish. Please consider that you have to separately mix the epoxy resin and hardener of each color before you mix them together. Below you find some examples of mixed colors and the corresponding mixing ratio.


Quick Assistance
The following table outlines typical epoxy clay application problems, along with possible causes and recommendations on avoiding them.
| Problem | Cause |
|---|---|
| Ceralun does not cure. | 1, 2, 6 |
| Ceralun is not bonding with the base material. | 1, 2, 3, 6 |
| Crystals fall off. | 1, 2, 4, 5, 6 |
| Ceralun cannot be removed from the silicone mold. | 7, 8 |
| Using the stamping technique, Ceralun cannot be removed from the surface pattern. | 7 |
| Ceralun appears foggy/cloudy after curing. | 5, 6, 7 |
| Cause | Recommendation |
|---|---|
| 1 An error has occurred during the calculation of the right mixing ratio between the two components (resin/hardener). | Do not deviate from the recommended mixing ratio of the components (resin/hardener), 1 : 1. |
| 2 Resin and hardener have not been mixed until a homogenous appearance was achieved. | Be sure to use the exact recommended dosage and mix both components until a homogenous mixture is achieved. |
| 3 The base material is not suitable for using Ceralun or it has been incorrectly pre-cleaned. | Check the surface tension. If the surface tension is below 38 mN/m, carry out pre-treatment cleaning methods. |
| 4 The specified processing time was exceeded and as a result Ceralun has already hardened. | Reduce the processing time to a maximum of two hours at a temperature of 23 °C (73.4 °F). |
| 5 If stored in the freezer, condensed water can occur during the defrosting process. | Take care to gently remove any condensed water that occurs during the defrosting process. |
| 6 Ceralun has been stored for too much time in the freezer. | Make sure not to exceed the recommended time of 24 hours when Ceralun is stored in a freezer at a temperature of around –20 °C (–4 °F). |
| 7 No or not enough Release Agent has been used. | The Release Agent is a useful tool to be able to remove Ceralun from any surface. Carefully dose the used amount of Release Agent. |
| 8 Ceralun has not been stored in a freezer or has been stored for too little time. | Storing Ceralun in a freezer makes it easier for you to remove it from the mold. |