
Gluing
Swarovski products can be glued to a wide range of materials in a variety of application areas. The greatest quality is ensured by following the entire application process.
Product Overview & Machines and Tools
The following products are suitable for gluing with an additional adhesive system:
| Product | Gluing with additional adhesive system |
|---|---|
| Round Stones | ✓ |
| Fancy Stones | ✓ |
| Crystal Pearls | ✓ |
| Pendants | ✓ |
| Flat Backs No Hotfix | ✓ |
| Crystal Textures | ✓ |
| Linked Crystal Components: Crystal Mesh | ✓ |
Machines and tools
The following machines, tools and aids can be used for the various processes involved in gluing Swarovski products.


For XILION Chatons.

For XIRIUS Chatons.

For XIRIUS Light Chatons.


Art. 9030/000.


Courtesy of I & J Fisnar, Inc.


Art. 9030/126.

Two-component epoxy resin glue: 25 ml resin + 25 ml hardener.

Two-component epoxy resin glue: 50 ml resin + 50 ml hardener.

Two-component epoxy resin glue: 1 l resin + 1 l hardener.

Two-component epoxy resin glue: 33.3 ml resin + 16.7 ml hardener.

Two-component epoxy resin glue: 500 ml resin + 250 ml hardener.


Art. 9040/022. Can be adapted to a pick-up system by attaching a dispensing tip, ordered separately.


Tools and setup support
Typical tools and materials used for Swarovski crystal gluing include:
- CNC milling machine, box column drill, hand drill, 90° / 95° / 163° twist or NC drills, and milling cutters
- Test Pen (art. 9030/000), isopropyl alcohol, acetone, blow torch, corona treater, plasma cleaner, and precision balance
- Dispensing robot, fluid dispenser, dispensing gun, dispensing syringes with dispensing tips, and mixing nozzle (art. 9030/126)
- CG 500 (A+B), CG 610 (A+B), and other adhesive systems selected for the application
- Chaton Sieve, vacuum pump with silicone hose (art. 9040/022), tweezers, wax stick, UV light, and drying oven
- Plastic gloves and protective eyewear
If you need help choosing a suitable setup for your application, contact eCrystalHouse. We can review the crystal type, base material, adhesive system, production volume, and curing requirements, then help you select and supply a practical set of compatible tools and materials for testing or production.
Application
When gluing Swarovski crystals, optimal results are obtained by coordinating the entire application process. Following the application steps in the right order is very important.
Experience has shown that the most common reasons for crystals becoming detached are inappropriate areas of application, poorly produced cavities, unsuitable gluing systems, and insufficient quantities of glue. Product-specific application instructions are detailed later in this section.
Cavity production
Many Swarovski crystals require cavities in order to be applied to materials. A properly produced cavity in combination with a suitable gluing system ensures a stylish, long-lasting application. The cavity makes it easy to glue properly and ensures higher protection of the crystal against mechanical and chemical stress.
There are several different production methods and cavity types. Always take into consideration the requirements and base material of the finished product when choosing the appropriate cavity, pre-treatment method, and kind of glue.
Please note: Swarovski provides 3D data in various formats and technical drawings with dimensions and tolerances for all crystals. Should you require these, please contact your Swarovski representative.
Production methods
Casting
To reproduce cavities, particularly in the jewelry sector, the cavities can be made when the metal component is cast. When following this process, the cavities must be cut into the original model. To prevent the bottom of the cavity being rounded off, which would result in the crystal sitting too high, it is recommended that an additional indentation is made when producing the original model.
- Lost wax in jewelery manufacturing
- Rubber mold process in jewelery manufacturing
Injection molding
Is the most commonly used manufacturing process for the fabrication of plastic and metal parts. A wide variety of products are manufactured using injection molding, which vary greatly in their size, complexity, and application. The injection molding process requires the use of an injection molding machine, raw plastic or metal material, and a mold. The plastic or metal is melted in the injection molding machine and then injected into the mold, where it cools and solidifies into the final part.
Milling
Milling is when materials are machined using a milling machine and milling cutter. Milling machines can be fitted with appropriate tools depending on the materials, e.g. for working with metal and plastic, wood, or natural stone. Modern CNC machining centers offer the greatest precision and can be used to produce cavities of every shape necessary. Please note that when machining natural stone, ceramic, or glass, for example, special diamond-tipped tools must be used.
Drilling
Drilling is when materials are machined using a power drill and drilling tool.
Water jet cutting
Water jet cutting allows materials to be separated via a high-pressure jet of water. Economic reasons make water jet cutting machines ideal for certain stone shapes that are integrated into flat materials. Please note that only end-to-end cavities can be produced in this way. In addition, materials that swell through water cannot be worked with. Absorbent materials must be fully dried before gluing the crystal.
Cavity types
Depending on the Swarovski products used, various cavity types can be made using the different production methods.
Chaton cavity
Drilling

The optimal cavity for a XIRIUS Chaton is produced at an angle of 95°–98°, for a XILION Chaton at 90°–93°, for a XIRIUS Light an angle of 163°–166°. The cavity should have the same maximum diameter as the crystal plus at least 0.1 mm.
The stone sizes available for Swarovski crystals can be found in the General Information size reference. For particularly large crystals with a prominent girdle, it is advisable to use an additional countersinking process.
Chaton casting cavity

For items manufactured by casting, an additional indentation at the bottom of the cavity can be drilled to avoid a rounded tip, therefore preventing the crystal from being raised out of the cavity.
Additional cavity types
Indentation
Crystal Textures*
Milling

When gluing an article with a flat back it is also advisable to create a cavity as shown here. This cavity ensures that the crystal is better protected against mechanical and chemical stress. The depth of the cavity depends on the height of the girdle (Flat Back) or the height of the Crystal Textures and the thickness of the base material.
End-to-end cavity
Drilling
Water jet cutting

An end-to-end cavity is the simplest option when producing cavities. When selecting the glue, please note the additional instructions regarding the gluing gap.
Blind hole
Milling

A blind hole is another option when producing cavities. It allows Swarovski crystals in a variety of heights to be set and protected in the material. When selecting the depth of the cavity, ensure that there is still a gap between the lowest point of the crystal and the base material. When selecting the glue, please note the additional instructions regarding the gluing gap.
Step milling
Milling

Compared to a simple blind hole, step milling offers better hold of the crystal with less glue. When selecting the depth of the cavity, ensure that there is still a gap between the lowest point of the crystal and the base material. When selecting the glue, please note the additional instructions regarding the gluing gap.
* for crystal texture (except from coldfix and removable foil)
3D milling and production tolerances
3D milling
Milling

3D milling offers an optimum fit with the smallest gluing gap. Due to the fact that the cavity is adapted to the contours of the crystal, CNC milling machines are required.
Production tolerances for cavities
When producing cavities, the dimensions should be based on the main dimensions, including the maximum tolerance for the crystals used, and the production tolerance. These dimensions can be requested from your Swarovski sales organization.

Incorrect cavities


Checking surface tension and pre-treatment
Checking the surface tension
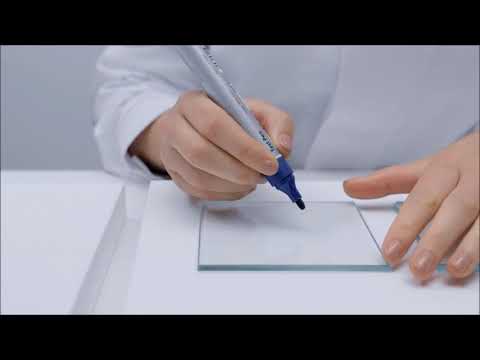
The surface tension is an indicator for the wetting properties of the surface to be glued. A surface tension of at least 38 mN/m is recommended for gluing Swarovski crystals. It should also be randomly tested during production. It is best to use the Test Pen (art. 9030/000) to measure the surface tension.

Before gluing, mark the surface.

If the ink remains visible for 2 seconds, the surface is suitable for gluing.

If the ink disappears or forms bubbles, the surface is not suitable for gluing. In this case, the pre-treatment cleaning methods should be checked.
Note: On porous or absorbent materials, the surface tension cannot be checked with the Test Pen. If the Test Pen is used on highly polluted surfaces (e.g. grease, oil) or on material like wood, the Test Pen might be polluted as well and cannot be used anymore.
Application Instruction Movie
Checking Surface Tension
See all Swarovski Application Technique Videos.
Pre-treatment
If the surface tension is below 38 mN/m, the following pre-treatment cleaning methods, applied in the correct order, can be effective in reaching the right level. After each cleaning process, the surface tension has to be checked again.
Pre-treatment cleaning methods
1 Mechanical cleaning
This involves sanding, blasting, or brushing but is usually not necessary for jewelry.
- Removal of dirt, rust, scale, and residues of varnish
- Roughening the surface
2 Washing and degreasing
It is important to ascertain that the tensides do not contain silicone, as this would impair adhesion. When using solvents it is advisable to test the durability of the surface to be cleaned beforehand to avoid any damage. Solvents containing substances with a high boiling point should not be used due to the risk of residue. If using cleaning solvents, wait a few minutes to allow them to evaporate.
- Cleaning with tenside solutions, rinsing with de-ionized water
- Cleaning with isopropyl alcohol/ethanol
- Cleaning with acetone (MEK/ethyl acetate)
- Cleaning with a cleaning solvent: should not contain high boiling point substances (risk of residue)
3 Physical cleaning and activation
These cleaning methods can be applied if mechanical cleaning or washing and degreasing are either not possible or have not resulted in a surface tension of >38 mN/m. Therefore the pre-treatment cleaning method used should be done on a case-by-case basis.
Flame treatment via a blow torch
The surface to be treated is exposed to the flame of a torch very briefly. When using special gas mixtures, surface silication can also be carried out, so as to apply a more adhesive coating.
Corona treatment
An electric corona discharge is briefly applied to the surface.
Plasma treatment
Plasma treatment offers precise cleaning and activates the surface via an ionized gas.
4 Chemical cleaning and primers
Applying a primer improves adhesion and helps to prevent corrosion.
- Applying small amounts of solvent and activating the surface.
- Applying a primer.
Choice of glue
The selection of the best gluing system is the next stage in ensuring a long-lasting application.
When selecting the most suitable glue, the following factors should be considered:
- The type of cavities/the resulting gluing gap
- The size of the crystals/gluing surface
- The gluing properties and finish required
- The type of base material
Factors in glue selection
The type of cavities/the resulting gluing gap
When selecting an adhesive, it is also important to consider the gluing gap that results from the type of cavity chosen. For cavities offering a large gluing gap, soft and gap-filling glues such as silicone glue are recommended to avoid tension in the glue joint.
Epoxyethane/polyurethane glues offer greater strength and can be used for cavities with a small gluing gap.


The size of the crystals/gluing surface
Please note that when gluing small crystals, glues with higher shearing strengths (e.g. CG 500 (A+B) two-component epoxy glue) should be used. Further information can be found in the manufacturer’s technical data sheets.
The gluing properties and finish required
When selecting glues, it is important to consider properties such as pot life, viscosity, color, curing time, ease of dosing, and shrinkage. Further information can be found in the manufacturer’s technical data sheets.
Adhesives tend to shrink during curing. There will be a greater amount of shrinkage if the wrong glue has been chosen, it is hardened under the wrong conditions, or if there is an incorrectly sized cavity (too much space around the crystal). The tension thus created can damage the foiling and the crystals may even detach. Glues that are very hard after curing and shrink considerably are not suitable for Swarovski crystals with foiling.

The foiling is torn from the crystal because of excessive glue shrinkage (shown in yellow).
The type of base material
The following table provides a selection of commonly known and globally available adhesives that are suitable for different uses and materials. Application tests are advisable to make sure the chosen glue fulfills the specific needs of your application.
Choice of glue: base materials
Viscosity: Measure of a fluid‘s resistance to gradual deformation by shear/tensile stress. It corresponds to the informal notion of 'thickness'.
Color: Description of the glue‘s color type after curing.
Bonding: Depending on the carrier material, the bonding of the glues can vary.
| Property / carrier material | Two-component epoxy resin glues | Polyurethane glues | Cyanoacrylate glues | UV glues¹ | Silicone glues | Double sided tapes | Dispersions & contact glues | ||||||||||
|---|---|---|---|---|---|---|---|---|---|---|---|---|---|---|---|---|---|
| CG 500 (A+B) | CG 610 (A+B) | Araldite® 2011 | RBC adhesive #118 A/B | DELO-DUOPOX® CR8021 | 3M™ Scotch-Weld™ DP 190 | Araldite® 2028-1 | 3M™ Scotch-Weld™ DP 610 | DELO-PUR 9895 | LOCTITE® 401™ | DELO-PHOTOBOND GB368 | HS 34 S 233 | HS 34 S 77 | ELASTOSIL® N 2199 | 3M™ | C. Kreul Hobby Line Schmuckstein Kleber | CHRISANNE CLOVER Crystal Glue | |
| Color | translucent | translucent | beige | translucent | translucent | white/gray | transparent | transparent | beige | transparent | transparent | transparent | transparent | transparent | transparent | transparent | white |
| Viscosity | med | low | high | med | med | high | low | high | high | low | med | med | med | high | - | med | high |
| Glass | + | + | + | + | + | + | O | O | O | – | + | + | + | – | O | ||
| Ceramics | + | + | O | + | + | + | + | + | + | – | – | + | + | O | O | ||
| Stone | + | + | O | + | + | + | + | + | + | – | – | + | + | O | O | ||
| Aluminum | + | + | + | + | + | + | + | + | + | O | + | + | + | O | O | ||
| Brass | + | + | + | + | + | + | + | + | + | O | + | + | + | O | O | ||
| Silver | + | + | + | + | + | + | + | + | + | O | + | + | + | O | O | ||
| Steel | + | + | + | + | + | + | + | + | + | O | + | + | + | O | O | ||
| PC | + | + | O | + | + | + | O | O | O | + | O | O | O | O | O | ||
| PS | + | + | O | O | + | + | O | O | O | + | O | O | O | O | O | ||
| PVC/ABS | + | O | O | + | + | + | O | O | O | + | O | O | O | O | O | ||
| PMMA | + | O | O | O | + | + | O | O | O | + | + | + | + | O | O | ||
| Paper | O | O | O | + | O | O | O | O | O | O | – | + | + | O | O | O | O |
| Cork | O | O | O | + | O | O | O | O | O | – | – | + | + | O | O | ||
| Wood | O | O | O | + | O | O | O | O | O | – | – | + | + | O | O | O | |
| Textiles² | – | – | – | – | – | – | – | O | – | – | – | + | + | – | – | O | O |
1 The second gluing part has to be UV transparent. 2 For permanent (wash-resistant) application a Hotfix application is suggested.
Applications on plastics
There are many types of synthetic materials. The following table contains information regarding the adhesive qualities of a selection of plastics.
| Plastic | Adhesive qualities |
|---|---|
| ABS | good |
| ASA | good |
| CA | good |
| EP | good |
| PA | very difficult |
| PC | good |
| PE | difficult |
| PET | difficult |
| PF | good |
| PIB | good |
| PMMA | good |
| POM | difficult |
| PP | difficult |
| PS | good |
| PTFE | very difficult |
| PVC-U | good |
| PVC-P | very difficult |
| SAN | good |
| SILICONE | very difficult |
| UP | good |
CG 500 (A+B) Two-component epoxy resin glue
CG 500 (A+B) is a high-performance gluing system for both foiled and unfoiled Swarovski crystals, exclusively distributed by Swarovski for professional use within the jewelry segment and other industries such as accessories, interiors, and electronics.
Key features
- Ideal mechanical resistance
- Ideal chemical resistance
- Future-oriented solution
- Diverse areas of application
Ideal mechanical resistance
CG 500 (A+B) absorbs impacts and withstands distortion. In addition, maximum elasticity protects the foiling.


Ideal chemical resistance
| CG 500 (A+B) offers excellent chemical resistance against | Result |
|---|---|
| Humidity | CG 500 (A+B) prevents infiltration of humidity into the glue and thus any corrosion. Jewelry pieces can be stored and worn in places with high humidity. |
| Perspiration | CG 500 (A+B) prevents infiltration of perspiration into the glue and thus avoids corrosion. The glued Swarovski products are not damaged by perspiration. |
| Salt and chlorinated water | CG 500 (A+B) protects Swarovski crystals when they are exposed to salt or chlorinated water. The glued Swarovski products are not damaged during swimming. |
Diverse areas of application
| CG 500 (A+B) offers ideal adhesion features on | Examples |
|---|---|
| Metals | E.g. application of Swarovski products on plated surfaces, brass, stainless steel, titanium, gold, rhodium, and silver within the jewelry industry |
| Gluable synthetics and rubber | E.g. application of Swarovski crystals on ABS, PMMA, PVC etc. within the accessories and electronics industries |
| Glass, crystals, wood, stone, cork, and porcelain | E.g. application of Swarovski products in the interior and home décor industries |
Technical data of CG 500 (A+B)
| Mixture ratio (A : B), by volume | 100 : 100 (resin : hardener) |
|---|---|
| Mixture ratio (A : B), by weight | 100 : 86 (resin : hardener) |
| Pot life at room temperature (23 °C/73.4 °F), quantity applied: 1g | 15 min. |
| Complete curing time at room temperature (23 °C/73.4 °F) | 24h |
| Complete curing time in oven (40 °C/104 °F) | 12h |
| Complete curing time in oven (80 °C/176 °F) | 2h |
| Complete curing time in oven (100 °C/212 °F) | 1h |
| Handling time at room temperature (23 °C/73.4 °F) | 3h |
| Viscosity (mixed) | 20,000 +/– 5,000 mPa*s |
Mixing CG 500 (A+B) two-component glue tubes
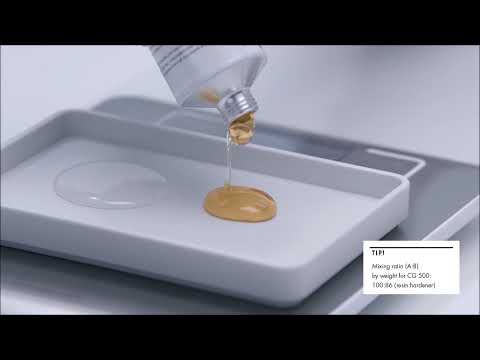
The exact mixing of the two-component glue is especially important. Only a fully homogenous mixture leads to the desired results. Care must be taken to follow the manufacturer’s instructions.

Use an electric scale to weight out the two components at a ratio of 100 : 86 (resin : hardener).

Both components come in different color shades so that it is easy to see if they are thoroughly mixed.

Mix the two components until a homogenous result is achieved.

Put the glue in a dispenser.

Attach the dispensing tip to the syringe.
Application Instruction Movie
Mixing Two-Component Adhesive
See all Swarovski Application Technique Videos.
CG 610 (A+B) two-component epoxy resin glue
The CG 610 (A+B) two-component epoxy resin glue was specially developed for gluing Swarovski crystals of very small sizes, starting with PP 0. Depending on the area of application the adhesive can be used for crystals up to the size of PP 14.
Key Features
- Suitable for gluing very small crystals (starting with size PP 0)
- Low viscosity allows an easier dosing of small glue quantities
- Cost saving due to long pot life (140 min.)
Technical data of CG 610 (A+B)
| Mixture ratio (A : B), by volume | 100 : 50 (resin : hardener) |
|---|---|
| Mixture ratio (A : B), by weight | 100 : 48 (resin : hardener) |
| Pot life at room temperature (23 °C/73.4 °F), quantity applied: 1g | 140 min. |
| Complete curing time at room temperature (23 °C/73.4 °F) | 72h |
| Complete curing time in oven (40 °C/104 °F) | 18h |
| Complete curing time in oven (80 °C/176 °F) | 4h |
| Complete curing time in oven (100 °C/212 °F) | 1.5h |
| Handling time at room temperature (23 °C/73.4 °F) | 24h |
| Viscosity (mixed) | 1,750 +/– 250 mPa*s |
Mixing CG 610 (A+B) two-component glue cartridgee
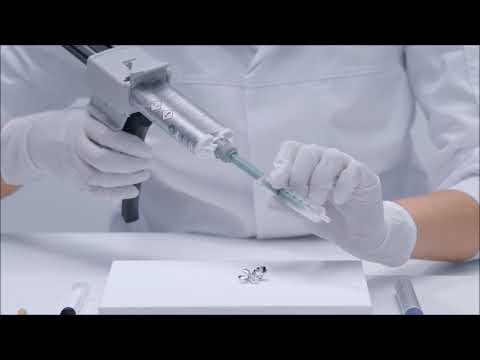
The 50 ml cartridge of CG 610 (A+B) is designed in a way that the containing resin and hardener do not have to be mixed together by the user. Just attach a dispensing gun and the mixing nozzle (delivered with the 50 ml adhesive package) to the cartridge and start gluing.


When using glue of the 750 ml box, resin and hardener have to be mixed in a different way. First, weigh the two glue components at a ratio of 100 : 48 (resin : hardener). It is very important to keep an exact mixing ratio of the two components to achieve maximum adhesion. Mix the two components well for at least one minute. Only a fully homogenous mixture leads to the desired results. When a homogenous mixture is achieved, put the glue into a dispenser/syringe and attach a dispensing tip.
Dosage and setting
Dosage
The glue can be precisely dispensed via a variety of dosage systems. Dispensers with a vacuum connection prevent the glue from dripping and reduce the amount of cleaning needed. The correct amount of glue will additionally protect the foiling from external influences. Attention must be paid to the application and quantity of the glue.
Glue application
Irrespective of the shape of the gluing area, the glue should be applied as follows:
With a round gluing area, a dot of glue in the centre is sufficient. When the crystal is applied, the glue will be evenly distributed in the gluing gap. To glue a single spot, aim the dispensing needle just above the spot to be glued and lift it slowly upward to avoid any glue spreading out sideways.
With a square or rectangular gluing area, apply a cross of glue to ensure it is evenly spread into the corners.


Glue quantity
When selecting the amount of glue to dispense, ensure that when setting and pressing down on the crystal, the glue spreads to the edges, thus offering additional protection for the foiling.
Round Stone


Fancy Stone


Setting
Once the glue has been dispensed the Swarovski product can be positioned. Pick up the crystals, for example with a wax stick or tweezers, apply them to the gluing position, and press down gently.
For preparing Chatons for the positioning process, a Chaton Sieve can be helpful. Take the sieve according to the Chatons’ sizes. Place some crystals onto the sieve. By slightly shaking the tool and wiping over it with glove-covered fingers, the majority of Chatons automatically turn into the suitable position for gluing (table pointing upwards).

As a next step the Chatons can easily be picked up from the Chaton Sieve using a tool like the wax stick, tweezers, or a vacuum pick-up system.
The use of a silicone pick up tool is not recommended as this can impair the adhesion and the brilliance of the crystals.
Apply the crystals to the gluing position and press down gently. When working with cavities with large gluing gaps, the following tools assist in ensuring the optimum positioning:


To prevent the crystal from sinking or tipping during the hardening process, a small plasticine ball can be used to fix it in place.
Post-cleaning and curing
Post-cleaning
Excess glue that escapes during setting can be carefully removed using a cotton wipe that has been soaked in a solvent, e.g. isopropyl alcohol.
It must be removed while the glue is hardening, as dried glue cannot be fully removed. Remember to follow the glue manufacturer’s instructions, as well as considering the resistance of the base material.
Curing
The curing time of the glue depends mainly on the temperature, or on the humidity in the case of silicone glues. Please note the glue manufacturer’s instructions.
To minimize shrinking and tension during hardening, we recommend for standard two-component epoxy resin glues a maximum curing temperature of 50 °C (122 °F), with the exception of CG 500 (A+B) and CG 610 (A+B).
Both adhesives can be cured at a maximum temperature of 100 °C (212 °F), without any changes to its properties.
Overview of the simplified gluing process

Make sure that the surface on which you want to apply a crystal is suitable for gluing. Use the Test Pen (art. 9030/000) to check the material’s surface tension.

The surface must be correctly pre-treated before gluing (e.g. cleaning, degreasing).

The glue should be applied with a dispenser.

Pick up the crystal, using e.g. a tweezer, a plasticine stick or a vacuum pick up system. Carefully place the crystal and press it down gently.

Remove excess glue with a cotton stick soaked in a solvent eg. Isopropyl alcohol. Let the glue cure according to the manufacturer’s guidelines.
Application Instruction Movie
Gluing
Product-specific application instructions
Application Advice for Crystal Textures Foil Overlay
Crystal Textures Foil Overlay is a quick and easy way of applying products from the Crystal Textures assortment. In addition to Hotfix, the foil overlay has now made these products suitable for including in designs using the sewing or gluing technique.
This makes these products the perfect solution for customers working with carrier materials that are not suitable for Hotfix application. Examples include materials that are pressure- or heat-sensitive, such as smooth leather or technical fabrics that do not absorb Hotfix glue.
Gluing technique
Using an additional gluing system, e.g., CG 500 or Araldite 2028, a Crystal Textures Foil Overlay motif can easily be included in designs.
The glue is applied to the reverse side of the motif or to the upper surface of the overlay foil. Solvent-based polyurethane adhesives can also be used, although we do not advise using a water-based polyurethane adhesive!
Using a glue to add the Crystal Textures Foil Overlay to designs is recommended for industries that are not exclusively working with textiles. For instance, in the shoe industry, where mainly PU materials are processed, Crystal Textures Foil Overlay can be applied to the side of a midsole.
For all gluing methods, we strongly recommend carrying out tests in accordance with customers’ needs and specifications.

Applying UV-transparent materials
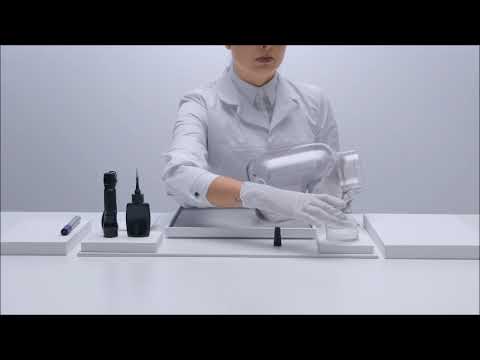
When using UV glue, at least one part of the materials must be translucent for UV light. On a metal surface for example, only crystals without foiling can be applied. Similarly, foiled crystals can only be glued to UV-transparent materials.
UV transparent materials: Please note that some crystal and glass colors as well as UV-stabilized plastics absorb UV light and are thus unsuitable for UV glues.

The surfaces to be glued must be properly pre-treated to achieve a sufficient surface tension. This can be tested via a Test Pen (art. 9030/000).

Dispense the UV glue.

Press down on the crystal, until the glue completely covers the gluing area.

Cure the glue for a few seconds using a UV light (following the manufacturer’s instructions), and remove any excess glue using a cleaning agent. The curing process can then be continued, according to the manufacturer’s instructions.
Note: It is recommended that UV-protective eyewear is worn during curing, to prevent injury. Please follow the manufacturer’s instructions.
Application Instruction Movie
UV Gluing with Pointed Chatons
Applying Crystal Textures on solid surfaces (with additional gluing system)

The surfaces to be glued must be properly pre-treated, so as to achieve sufficient surface tension.

Apply the correct amount of glue onto the carrier material.

Spread the glue equally on the material.

Position the motif in the desired location and press down firmly for a few minutes.

Glue that escapes during positioning can be carefully removed using a cotton wipe.

During curing it is suggested to put some weight on the motif.
Applying Flat Backs No Hotfix for mosaic tiles
Due to their dimensions (outer dimensions and height) and coating (protective lacquer), selected Flat Backs No Hotfix have been tailored specially for use in tiles and mosaics.
Protective lacquer is applied to the foiling of all crystals, and fully covers the reflective surface. Protective lacquer prevents moisture, cleaning agents, etc. from coming into direct contact with the reflective layer, which can lead to corrosion and damage the crystal.

Long-term, satisfactory solutions can only be achieved with paper-glued mosaic tiles and the use of recommended tile glues and joint sealers. When working with net-glued mosaics, their absorption and storage of moisture means the support net must be completely removed in the areas where the crystals are to be applied.
Find suppliers for tile glues and joint sealers on the supplier list in this Gluing section. Solvent-resistant and alkaline tile glues and joint sealers are not recommended.
Unsuitable areas of application
- In swimming baths and steam rooms
- In contact with chlorine and other aggressive cleaning agents
- In saunas, due to the high temperatures and moisture
- Outside
Mosaic application procedure

Cut out the marked tile area and remove it from the mosaic.

Apply the tile glue to the prepared base according to the manufacturer’s instructions, then carefully position the mosaic tile and press down.

Place the individual crystals in the gaps and lightly press down.

Before curing, remove any excess glue with a damp sponge; follow the manufacturer’s information regarding curing.

After curing, remove the paper support. Following this, the mosaic can be grouted with a soft rubber scraper.

Excess joint sealer can be removed with a wet sponge during curing.
Note: Please be aware that many tile glues and joint sealers can contain abrasive materials, which can lead to scratching of the crystals. To avoid damaging the crystals, these parts should be carefully cleaned with mild, pH-neutral cleaning agents and cleaning sponges.
Useful information
Applications on silver product
Without protection, silver product can turn yellow or black with time due to chemical reactions. To slow or stop these reactions the surface of silver items are often covered with a temporary (wax-based) or permanent protective coat (varnish-based).
Tarnishing on the surface of the metal often results in a decline in the surface tension under the recommended 38 mN/m.
| Temporary protection against tarnishing | Permanent protection against tarnishing |
|---|---|
| Wax-based Low surface tension | Varnish-based Surface tension depends on varnish |
| Recommendation: Protect the rest of the piece after gluing | Recommendation: Use a tarnishing protection system with sufficient surface tension |
Protective film
A self-adhesive film can protect against dirt during the application process and aid in positioning.
Blind hole

To protect the surface of the material used (e.g. metal, tiles, etc.) from dirt, a self-adhesive film can be applied.

It is then cut out along the previously produced cavities.

The crystal can now be glued into the cavity. Once any excess glue has been removed, the adhesive film can be removed following curing.
End-to-end cavities

Apply a self-adhesive film to the front of the material.


Now fill the cavity with glue. The glue should cover the entire foiling of the crystal, so as to avoid corrosion. The self-adhesive film prevents the glue spreading onto the front.

Once the glue has cured, the film can be removed.
Note: Highly viscous glues are best suited for end-to-end cavities, as they do not spread through the cracks at the front.
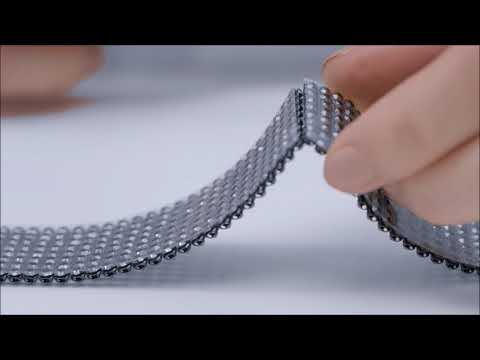
Cutting and gluing Crystal Mesh
The transparent film should not be removed before gluing. The film allows the individual crystals to be aligned perfectly, and provides Crystal Mesh with the stability necessary for flawless application.

Cut the transparent film between the rows of crystals with a knife, but do not pull them apart, otherwise the stability of the crystals will be lost.

After cutting the film, there is some space between the rows which allows you further processing.

Cut the metal mesh with a scissor along the scored line, and remove the excess link rings. The Crystal Mesh is now ready for gluing.
When gluing flexible Crystal Mesh products, do not remove the transparent film until the glue has cured to ensure the proper alignment of the mesh.

Application Instruction Movie
Cutting Crystal Mesh
Cutting Crystaltex Chaton Bandings
When working with Crystaltex Chaton Bandings, the lack of space between crystals means great care must be taken during cutting, so as to avoid damaging the crystals.


Quick Assistance
The following table outlines typical gluing problems, along with possible causes and recommendations on avoiding them.
| Problem | Possible cause reference |
|---|---|
| The crystal has become discolored: The crystal is matt or yellowed. | 1,2 |
| The crystal has become discolored: The crystal seems black and dull compared to the surrounding crystals. | 3 |
| The crystal has become discolored: The crystal has been plated. | 4 |
| The crystal has detached from the cavity without the foiling: The crystal has become discolored. | 5,6 |
| The crystal has detached from the cavity without the foiling: The crystal has detached with the mirror coating but without the platinum foiling or the glue. | 7,8,9 |
| The crystal has detached from the cavity with the foiling: Glue is attached to the crystal. | 10,11,12,13,14 |
| The crystal has detached from the cavity with the foiling: No glue is attached to the crystal anymore. | 15,16 |
| Excess glue: Before hardening. | 2 |
| Excess glue: After hardening. | 17 |
Causes and recommendations
| No. | Cause | Recommendation |
|---|---|---|
| 1 | Glue residues have not been completely removed and have been smeared over the crystal. | Use a suitable dispenser to apply exactly the right amount of glue. Dispensers with a vacuum connection prevent the glue from dripping and reduce the amount of cleaning needed. |
| 2 | Too much glue was used. | Be sure to use the exact recommended dosage and to carefully remove any excess glue, e.g. using acetone or isopropyl alcohol. |
| 3 | The axis of the cavity was already off-center in the original model or the cavity was not drilled straight in the unfinished casting. | Use a special bit when drilling the original model. This offers more precise control of the direction and depth of the drilling. |
| 4 | The product was only plated after the crystals had been glued to it. | It is recommended to complete the plating before gluing the crystals. |
| 5 | A gluing gap that has not been completely filled is causing corrosion. | Make sure the exact dosage of glue is used. |
| 6 | Tensile stresses are reducing the adhesion of the mirror coating. Oxygen is penetrating between the stones and the mirroring and causing oxidization. | Use glue that is more elastic and that does not shrink as much. |
| 7 | An incorrect glue system was used. | Carry out tests with other glue systems. |
| 8 | Incorrect proportions of resin and hardener were used. | Follow the glue manufacturer’s mixing instructions. |
| 9 | Cleaning agents have affected the glue and/or the protective coating. | Use less solvent or a different type of solvent. |
| 10 | Residues of polishing agent were not completely removed before plating. | Double check the type of cleaning process used. |
| 11 | A varnished piece of jewelry has not been correctly pre-treated before gluing. | Improve the adhesion of the glue, e.g. with low-pressure plasma treatment or flame treatment if necessary. |
| 12 | Too little glue was used. | Make sure the exact dosage of glue is used. |
| 13 | The cavity has the wrong shape after plating. | Re-work the original model to improve the cavity shape. |
| 14 | Electrolyte residues have not been completely removed. | Double check the type of cleaning process used. |
| 15 | The specified processing time was exceeded and as a result the glue has already hardened. | Reduce the processing time. |
| 16 | General glue problems. | Follow the manufacturer’s instructions. Check the conditions under which the glue is stored. Excess solvent could have corroded the glue and/or the foiling. |
| 17 | The product piece was put under stress before the glue had hardened. | Make sure the glue has hardened, for example before transporting the jewelry. |