
Self-Adhesive Elements
Self-adhesive Elements are eye-catching and innovative products that come ready-to-apply. Their glue-covered reverse side allows easy and fast application. When applied on paper and solid surfaces, they can create fantastic designs. Coldfix is a perfect alternative for leather and textiles which are not suitable for Hotfix application.
Product overview and field of usage
The following products are suitable for listed carrier materials:
| Application on solid materials* | Application on textile materials and leather** | |
|---|---|---|
| Crystal-it Infinity | ✓ | |
| Crystal Textures IT | ✓ | |
| Crystal Textures Coldfix | ✓ | |
| Crystal Textures Removable | ✓ |
* application on solid materials such as e.g. metal, glass, plastic. The material need to be suitable for gluing.
** application on textile materials and leather which are not suitable for Hotfix application.
Self-adhesive Elements have a coating of a pressure-sensitive glue on the back, enabling swift, simple application. This glue is activated by pressure (applied either by hand, rubber roller or heat press), and bonds with the carrier material. Crystal-it Infinity, Crystal Textures-it and Crystal Textures Removable foil motifs are suitable for the application on solid materials, while Coldfix is suitable for application on textile materials and leather which are not suitable for Hotfix application.
Crystal Textures adhesive systems
As Crystal Textures are available as Hotfix, IT, Coldfix and Removable version, please find here for a detailed overview the different material composition and proper fields of application for each product group. In general, all 4 versions are build-up very similar. The main difference will be in the adhesive used at the reverse side of the product.

Hotfix film
(thermoplastic polyurethane)
White protective film
- Heat resistance (min. 120 °C / 285 °F)
- Resistance against pressure
- Application area of the product
- Suitability of surface properties and absorbency
Coldfix film
(pressure sensitive adhesive)
Yellow protective film
- Heat-sensitive carrier materials (e.g. silk, cashmere, real and artificial leather ...)
- Pressure-sensitive carrier materials (e.g. wool, real and artificial leather ...)
- Textiles with a low level of absorbency (e.g. functional fabrics with water-repellent coating, ...)
- Easy and fast embellishment of finished products
IT film
(pressure sensitive adhesive)
White protective film
- Solid materials which are suitable for gluing (surface tension of at least 38mN/m)
Removable foil
(pressure sensitive adhesive)
White protective film
- Solid materials which are suitable for gluing (surface tension of at least 38mN/m)
- Humidity and low temperatures (below 10°C) reduce adhesion force significantly.
- Can be reapplied up to 10 times without substantial adhesion reduction.
Please keep in mind: Coldfix is not a replacement for our Hotfix products – it is a new alternative for difficult carrier materials that are incompatible with Hotfix products.
If Hotfix is applicable, we recommend using Hotfix technique as the achievable bonding strength is higher than applying a Coldfix product.
Machines and tools
The following machines, tools and aids can be used for applying Self-adhesive Elements.
Especially for Coldfix application onto textiles and leather:


Especially for IT- application onto solid materials:


Suppliers
The following machines and tools are commonly used for Self-adhesive Elements applications:
- NC drill / milling cutter
- Test Pen (art. 9030/000)
- Heat press
- Double heat press
- Teflon® foil (art. 9010/003)
- Rubber roller
If you need help choosing a suitable setup for your application, contact eCrystalHouse. We can review the Self-adhesive Element, carrier material, application method, and production volume, then help you select and supply a practical set of compatible tools and accessories for testing, pilot work, or ongoing production.
Application
When applying Swarovski Self-adhesive Elements, optimal results are obtained by coordinating the entire application process. Follow the application steps in the right order is very important. Experience has shown that the most common reasons for Crystal-it Infinity, Crystal Textures-it, Crystal Textures Coldfix and Crystal Textures Removable products becoming detached are inappropriate areas of application, not suitable carrier materials, and wrong application process (e.g. wrong angle when removing film, too less pressure during application). Before beginning the application process, you should always check whether the carrier material is suitable for application of Self-adhesive Elements.
Cavity production
In order to be able to position Crystal-it Infinity, Crystal Textures-it and Crystal Textures Removable products more easily and to better protect them from mechanical and chemical influences, it is advisable to prepare a cavity for this purpose.
Production methods
Milling is when materials are machined using a milling machine and milling cutter. Milling machines can be fitted with appropriate tools depending on the materials, e.g. for working with metal and plastic, wood, or natural stone. Modern CNC machining centers offer the greatest precision and can be used to produce cavities of every shape necessary. Please note that when machining natural stone, ceramic, or glass, for example, special diamond-tipped tools must be used.
| Swarovski products | Production method | Cavity type |
|---|---|---|
| Crystal-it Infinity Crystal Textures-it Crystal Textures Removable | Milling Casting | Indentation |


When applying an article with a flat back it is also advisable to create a cavity as shown here. This cavity ensures that the crystal is better protected against mechanical and chemical stress. The depth of the cavity depends on the height of the girdle and the thickness of the base material.
Production tolerances for cavities
Note: When producing cavities, the dimensions should consider the tolerance of the product and the production tolerance. The tolerances of the product can be requested from your Swarovski representative.
Checking surface tension and pre-treatment
Before beginning the application process, you should always check whether the carrier material is suitable for application of Self-adhesive Elements. There are different material checks necessary, depending if you want to apply a Crystal-it Infinity, Crystal Textures-it or Crystal Textures Removable on a solid material or a Coldfix product onto a textile or leather carrier material. Nevertheless, please note that there are certain types of plastics used for solid materials, textile and leather treatments that are difficult for any gluing connection. The following table contains a selection of materials that can cause problems for any glue application:
| Plastic | Examples | Adhesive Qualities |
|---|---|---|
| Polyamide (PA) | Degamid, Nylon, Perlon | very difficult |
| Polyethylene (PE) | Geberit, Hostalen G, Ferrozell | difficult |
| Polyethylene Terephthalate (PET) | Cardura, Atlas, Eralyt | difficult |
| Polyoxymethylene (POM) | Delrin, Kematal, Ertacetal | difficult |
| Polypropylene (PP) | Moplefan, Proplex, Verelite | difficult |
| Polytetrafluoroethylene (PTFE) | Teflon®, Gaflon, Ferrotron | very difficult |
| Silicone | Silopren, Contiduct, Corotex | very difficult |
To increase the bonding strength of a Coldfix product onto leather surfaces, experience shows that in some cases it could be helpful to clean the carrier material with isopropyl alcohol before applying the Coldfix product. We strongly recommend carrying out test to check if the carrier material does not get effected/damaged due to the alcohol.
Material check and pretreatment for solid materials when using Crystal-it Infinity, Crystal Textures-it or Crystal Textures Removable Foil products
Checking the surface tension
The surface tension is an indicator for the wetting properties of the surface to be glued. A surface tension of at least 38 mN/m is recommended for gluing Swarovski crystals. It should also be randomly tested during production. It is best to use the Test Pen (art. 9030/000) to measure the surface tension.

Before gluing, mark the surface.

If the ink remains visible for 2 seconds, the surface is suitable for gluing.

If the ink disappears or forms bubbles, the surface is not suitable for gluing. In this case, the pre-treatment cleaning methods should be checked.
Note: On porous or absorbent materials, the surface tension cannot be checked with the Test Pen. If the Test Pen is used on highly polluted surfaces (e.g. grease, oil) or on material like wood, the Test Pen might be polluted as well and cannot be used anymore.
Application Instruction Movie
Checking Surface Tension
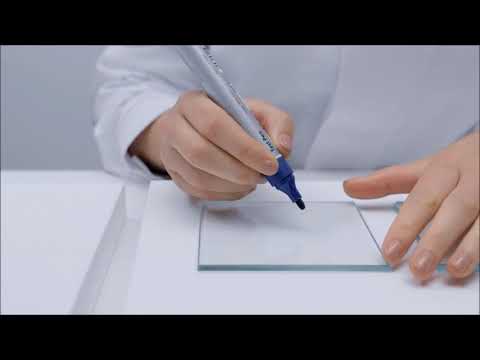
See all Swarovski Application Technique Videos.
Pre-treatment
If the surface tension is below 38 mN/m, the following pre-treatment cleaning methods, applied in the correct order, can be effective in reaching the right level. After each cleaning process, the surface tension has to be checked again.
| Types of cleaning | Pre-treatment cleaning methods |
|---|---|
| 1 Mechanical cleaning This involves sanding, blasting, or brushing but is usually not necessary for jewelry. |
|
| 2 Washing and degreasing It is important to ascertain that the tensides do not contain silicone, as this would impair adhesion. When using solvents it is advisable to test the durability of the surface to be cleaned beforehand to avoid any damage. Solvents containing substances with a high boiling point should not be used due to the risk of residue. If using cleaning solvents, wait a few minutes to allow them to evaporate. |
|
| 3 Physical cleaning and activation These cleaning methods can be applied if mechanical cleaning or washing and degreasing are either not possible or have not resulted in a surface tension of >38 mN/m. Therefore the pre-treatment cleaning method used should be done on a case-by-case basis. |
|
| 4 Chemical cleaning and primers Applying a primer improves adhesion and helps to prevent corrosion. |
|
Material check for textiles and leather when using coldfix
When applying Coldfix using a heat press with a temperature of 90 °C (195 °F) increases the bonding strength of the product and reduces the time of achieving the final strength, please check the following criteria:
- Heat resistance (min. 90 °C / 195 °F)
- Resistance against pressure
- Application area of the product (no bended/shaped area of the design)
Coldfix was developed for application on leather and textiles, which are not suitable for the Hotfix application process. To increase a Coldfix product’s bonding strength on leather surfaces, experience shows that in some cases it could be helpful to clean the carrier material with isopropyl alcohol before applying the Coldfix product. We strongly recommend carrying out tests to check that the carrier material is not affected or damaged by the alcohol.
Note: To ensure the best possible result, test applications on the intended carrier material are strongly recommended.
Preparation
Prior to application, some Swarovski products need some special preparation go achieve a high-quality gluing connection.
Preparation when applying Crystal Textures-it
Cutting Crystaltex Chaton Bandings
When working with Crystaltex Chaton Bandings, the lack of space between crystals means great care must be taken during cutting, so as to avoid damaging the crystal.

Cut into the support film between the rows with a Stanley knife.

Snap and cut off the Crystaltex Chaton Banding along the scored edge.
Preparation when applying coldfix motifs
Coldfix motifs are delivered on a sheet. Depending on the sizes and the shape of the motif, the quantity of motifs on a sheet can vary. Before separating the single motifs, its recommended to press the motifs using your hand or a rubber roller onto the transparent foil. Use a scissor to cut between the motifs. Now the motifs are ready for further processing and application.
Application
Applying Crystal-It Infinity
This self-adhesive product consists of Flat Backs in different shapes, sizes, heights, and colors. If applying it on materials such as metal, make sure the surface is free of pollution such as grease or oil.

Before starting, put the motif onto a solid underlay such as a desk and press the crystals onto the transparent film. This can easily be achieved when the transparent film points upwards.

Make sure the motif still lays on the desk, this time with the white protective film pointing upwards. Fix the motif with one hand, while peeling off the white film at an acute angle with the other hand.

Position the motif in the location desired and press down firmly.

Carefully remove the transparent film at an acute angle and press down the motif again.
Note: the minimum application temperature is 18 °C (64 °F) until the bonding strength for final use is reached. We recommend 72 hours. During this time, mechanical stress should be avoided.
If you face difficulties of the primal adherance on your desired surface, we recommend to use a heating plate with a bit of temperature (approx. 90° C for 60 seconds) to warm up the motif.
That will improve the adherance and simplify the application.
In case of issues when removing the transparent foil, be patient and take a little break before removing the foil. In example: If you are applying several motifs, apply them all, wait a few minutes and gently remove the foils.
Application Instruction Movie
Crystal-it Infinity
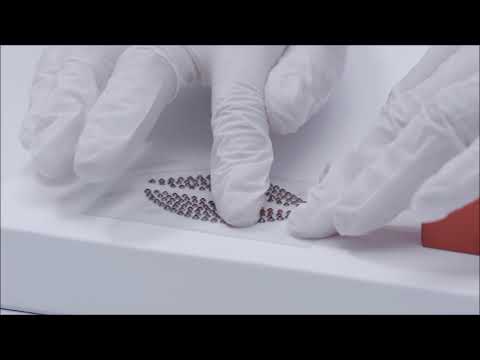
Applying Crystal Textures-it and Removable foil products
Crystal Textures-it products can be applied either wet or dry, whereas for the application of Crystal Textures Removable foil only dry application should be carried out.
Dry application

The surfaces to be glued must be properly pre-treated, so as to achieve sufficient surface tension.

Press the motif onto the transparent film.

Peel off the white protective film at an acute angle.

Position the motif in the location desired and press down firmly for around 10 seconds.

Carefully remove the transparent film at an acute angle and press down on the motif again.
Note: Prevent the self-adhesive back from sticking together, as separating it can cause damage. The minimum application temperature for Crystal Textures-it is 18°C (64°F), with the glue fully hardening after 72 hours. The minimum application temperature for Crystal Textures Removable Foil is 10°C (50°F).

Wet application of Crystal Textures-it
For larger motifs and those that must be positioned accurately on surfaces, a wet application is recommended. It is essential, however, that the base does not absorb the soap water that is used here.

Moisten the cleaned surface with soap water.

Carefully peel off the white protective film at an acute angle, and carefully position the product on the wet surface. After positioning it, press down on the soap water beneath the motif, e.g. using a rubber roller.

Carefully remove the transparent film at an acute angle and leave the surface to dry.

After drying, press down firmly on the motif again, e.g. using a rubber roller.
Note: Prevent the self-adhesive back from sticking together, as separating of Crystal Textures-it can cause damage. The minimum application temperature is 18 °C (64 °F), with the glue fully hardening after 72 hours.
Applying Coldfix
There are two ways of applying Coldfix products depending on material and application field. Cold application (room temperature) – Coldfix product is placed on a suitable carrier material and pressed down using a rubber roller. Final adhesive strength is reached after 72 hours. Application using a heat press (90 °C/195 °F) – Coldfix is applied from the reverse side using a heat press. Final adhesive strength is reached after 12 hours.
Please be aware that when applying Coldfix products using a heat press at some materials adhesion strength can be increased. At subsequent table some examples of adhesive strength differences are shown:
| Carrier material description | Cold application (room temperature) Final adhesive strength reached after 72h | Application using a heat press (90 °C/195 °F) Final adhesive strength reached after 12h |
|---|---|---|
| Tamurakoma N2012 col23 40g/m² | 3–4 N/cm | 3–4 N/cm |
| Gabardine TC black 210g/m², 65% polyester, 35% cotton | 3–4 N/cm | 6–7 N/cm |
| Lycra GGAQ black 120g/m², 73% polyamide, 27% elastane | 8–9 N/cm | 9–10 N/cm |
| Alcantara® regular 5015 black 230 g/m², 68% polyester, 32% polyurethane | 3–4 N/cm | 8–9 N/cm |
| Grain leather, black | 5–6 N/cm | 6–7 N/cm |
| Artificial leather black, 100% polyurethane, 315 g/m² | 4–5 N/cm | 4–5 N/cm |
* Tested following DIN 1939
Please note that achievable peel adhesion and bonding performance depend entirely on the characteristics of the carrier material used; it should be remembered that a gluing connection is only as good as the carrier material surface allows. Any oral, written, or test-based advice that Swarovski provides regarding techniques for the application of its products are recommendations based on Swarovski’s current knowledge and the information provided by its suppliers. Such advice does not discharge customers from carrying out their own tests on techniques they propose to use, and the suitability of these techniques for the intended application. The application, use and processing of these techniques and products are solely the user’s responsibility.
Cold application (room temperature 23 °C/73.4 °F)

Before application, press the motif onto the transparent film.

Peel off the yellow protective film at an acute angle.

Place the motif on the carrier material and press down firmly for around 10 seconds with a rubber roller.

Carefully remove the transparent film at an acute angle.

After removing the transparent film press down a last time firmly on the motif using a rubber roller. The application is now finished.
Note: Final adhesive strength is reached after 72 hours.
Application Instruction Movie
Cold Application
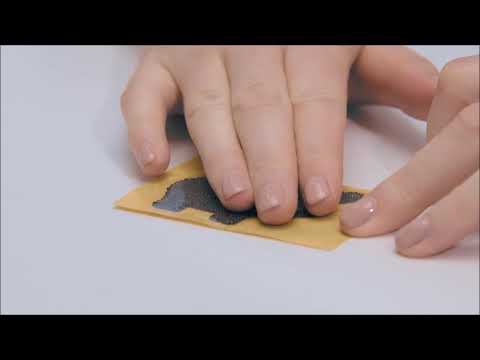
Application using a heat press (90 °C/195 °F)

Before application, press the motif onto the transparent film.

Peel off the yellow protective film at an acute angle.

Position the motif in the location desired.

Place the carrier material with the motif facing down in a heat press.

Use a Teflon® foil to protect the heat press.*

Close the heat press and apply the motif for 5 seconds at 90 °C (195 °F), using medium pressure!*

After the application is finished use a pressing cloth or a rubber roller to apply additional pressure to the product.

Once the product is at least hand warm the transparent film can be removed at an acute angle. The application is now finished.
Note: Final adhesive strength is reached after 12 hours.
* The application time depends primarily on the thickness of the carrier material used and should be tested by the customer.
Application Instruction Movie
Coldfix: Application Using a Heat Press
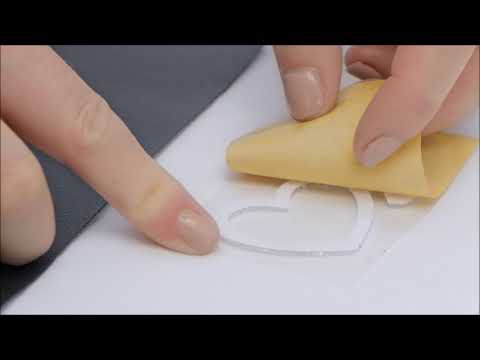
See all Swarovski Application Technique Videos.
Additional application advice
It is possible to move or use the final product carefully right after the application, as long as it is not exposed to any mechanical or chemical stress until the final adhesive strength is achieved. The time until the final adhesive strength is achieved varies depending on the application method (72 or 12 hours). Please note that any washing or quality assurance should take place after this period.
Quick Assistance
The following table outlines typical application problems with Self-adhesive Elements, along with possible causes and recommendations on avoiding them.
| Problem | Cause |
|---|---|
| The motive has insufficient adhesive power to the base material. | 1, 2, 3, 4 |
| The fabric or leather has changed its appearance after using the heat press (when applying Coldfix motif using a heat press). | 5, 6, 7 |
| The transparent film leaves pressure marks on delicate carrier materials. | 5, 6, 7, 8 |
| Loose Flat Backs remain on the white protective film (Crystal-it Infinity). | 9 |
| Loose Flat Backs remain on the transparent film (Crystal-it Infinity). | 10 |
| The separation of the white protective film and the transparent film is difficult. | 11 |
| Cause | Recommendation |
|---|---|
| 1 Cleaning agents have affected the glue. | Use less solvent or a different type of solvent. |
| 2 The base material was put under stress before the glue had reached its final strength. | Make sure that the suggested waiting time was respected (depends on product type and application process). |
| 3 The pressure is too low. | Thick fabrics and certain products need higher pressure. |
| 4 The surface of the base material is not clean. | Clean the base material. |
| 5 The pressure is too high. | Reduce the pressure of the heat press. |
| 6 The application time is too long. | Reduce the application time. |
| 7 The ironing pad is too hard. | Use a soft silicone pad. |
| 8 The transparent film leaves pressure marks. | Cut away more of the film, closer to the edge of the motif, to reduce marking. |
| 9 The Flat Backs do not stick on the transparent film. | Press the crystals to the transparent support film before removing the protective foil. |
| 10 The crystals do not stick on the base material after application. | Press the crystals to the base material before removing the transparent film. |
| 11 The white film sticks very strong together with the transparent film. | Cut away more of the film, closer to the edge of the motif. |